Simple Steps to Improve Your Home with DIY Blockout Curtains
Simple Steps to Improve Your Home with DIY Blockout Curtains
Introduction to DIY Blockout Curtains
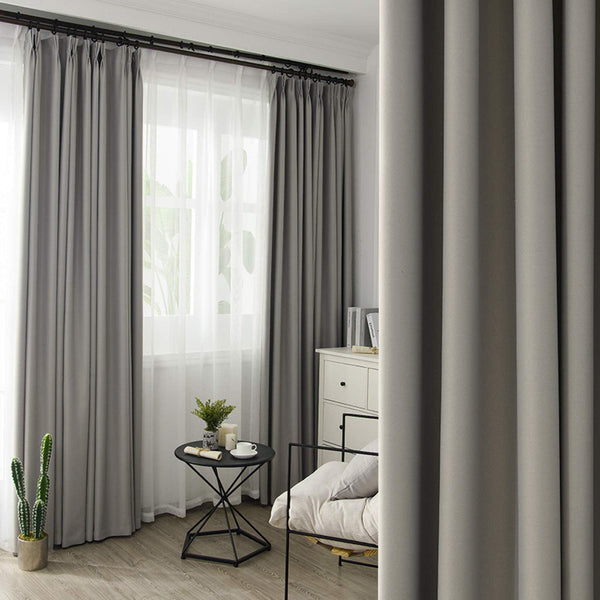
Blockout curtains are an excellent way to boost both the comfort and style of your home. They are particularly effective at providing privacy and blocking out unwanted light, making them an ideal addition to bedrooms, home theaters, nurseries, or any room where you need to control the amount of light coming in. By choosing DIY blockout curtains, you have the chance to tailor the project to your specific needs and preferences, all while staying within your budget. This DIY approach not only offers you greater control over the final product but also provides a sense of achievement once the project is complete.
One of the significant benefits of blockout curtains is their ability to create a dark environment conducive to better sleep. Light pollution can significantly disrupt sleep patterns, and having a properly darkened room can help improve the quality of your rest. Additionally, these curtains can also serve as an extra layer of insulation, helping to keep your home warmer in the winter and cooler in the summer. This can be especially beneficial in rooms that receive a lot of sunlight throughout the day, as the blockout fabric helps to reduce heat transfer and maintain a more stable indoor temperature.
The versatility of blockout curtains extends beyond their functional benefits. With a wide range of fabrics, colors, and patterns available, you can easily find options that match your home’s interior décor. Whether you prefer a minimalist look with neutral tones or a more vibrant and bold design, there are plenty of choices to suit your style. Customizing your blockout curtains allows you to create a cohesive look that complements the rest of your home.
Another advantage of DIY blockout curtains is the cost savings. Hiring professionals to measure, create, and install custom curtains can be expensive. By taking on the project yourself, you can allocate your budget more effectively, perhaps investing in higher-quality materials or additional décor elements to enhance your space. The process of measuring, ordering, and installing the curtains is straightforward enough for most homeowners to handle, even for those with limited DIY experience.
Taking on a DIY project like this can also be a fun and rewarding activity. It provides a great opportunity to develop new skills or refine existing ones, from measuring and cutting fabric to using tools and installing hardware. The sense of accomplishment that comes from successfully completing a home improvement project is invaluable and can inspire you to tackle other DIY projects around your home.
In summary, blockout curtains offer numerous benefits that make them a worthwhile investment for any homeowner looking to enhance their living space. They provide superior light control, improve energy efficiency, and can be customized to suit any interior design. By opting for a DIY approach, you gain the satisfaction of creating something tailored to your needs and preferences while also saving money. The process is accessible and rewarding, making it an excellent choice for anyone looking to make impactful improvements to their home.
Ordering Custom Curtains Online
When you're ready to order custom blockout curtains, the first step is to measure your windows accurately. Precision in measuring is essential for ensuring that your new curtains fit perfectly. Start by measuring the width of the window, including the frame, and then the height from the top of the frame to where you want the curtains to end. Be sure to note down these measurements carefully.
Next, visit the CAS Blinds website to begin the customization process. The website is user-friendly, allowing you to browse through a variety of fabric options, colors, and styles. Whether you’re looking for a specific color to match your existing décor or a unique fabric texture, the selection available will help you find exactly what you need.
Once you’ve selected your fabric and color, you'll be prompted to enter your window measurements. Double-check your measurements before submitting them to ensure accuracy. It's a good idea to add a little extra width to your curtain size to ensure complete coverage of the window and optimal light-blocking performance.
After inputting your measurements, you can choose additional custom options such as the type of header (e.g., grommet, rod pocket, or pinch pleat) and lining preferences. Each option can affect the overall look and functionality of your curtains, so choose according to your needs and style preferences.
Proceed to finalize your order by reviewing your selections and entering your payment information. The CAS Blinds website will guide you through the checkout process, ensuring a smooth transaction. Keep an eye out for any promotions or discount codes that may be available to save on your purchase.
Once your order is placed, you can expect a confirmation email with your order details and an estimated delivery date. Custom-made curtains typically take a little longer to produce and ship than standard off-the-shelf options, but the wait is worth it for a product tailored to your exact specifications.
While waiting for your curtains to arrive, you can prepare by gathering the tools and materials needed for installation. Ensure you have a reliable measuring tape, a level, a drill, screws, and a screwdriver on hand. If your curtain rod setup requires it, a stud finder can also be useful. High-quality curtain rods and brackets are recommended to support the weight of the blockout fabric effectively.
Once your custom blockout curtains arrive, unpack them carefully and inspect them to make sure everything meets your expectations. Check the fabric, color, and dimensions to confirm they align with your order specifications. If you notice any discrepancies, contact CAS Blinds customer service promptly for assistance.
Preparing your workspace for installation is the next step. Clear the area around your windows and have your tools and hardware ready. Following the installation process as outlined in your order instructions will help ensure a smooth and successful setup.
Remember, taking the time to measure accurately and double-check your order details will make a significant difference in the final outcome. By following these steps, you can look forward to enjoying the benefits of custom blockout curtains that fit your windows perfectly and enhance the comfort and style of your home.
Tools and Materials Needed
For a successful installation of your blockout curtains, having the right tools and materials is crucial. First and foremost, you'll need a reliable measuring tape to ensure accurate window measurements. A level is also important to help you achieve straight and evenly placed brackets, which are essential for the proper function and appearance of your curtains.
A drill is one of the most important tools you'll need. It allows you to create holes in your wall for the screws that will hold your brackets securely in place. Make sure to have a variety of drill bits on hand to match the size of your screws. Additionally, a screwdriver is necessary for tightening the screws and securing the brackets and curtain rod. Some brackets might come with specific screws, so it’s a good idea to check the hardware included with your curtain rod.
Depending on your wall type, you might also need wall anchors. These are particularly useful if you’re installing brackets on drywall without a stud behind it, as they provide extra support to hold the weight of your blockout curtains. If you're unsure about whether there’s a stud behind your wall, using a stud finder can help you locate it. This tool is handy for finding the wooden supports within your walls, providing a more secure spot for your screws.
When it comes to the curtain rods and brackets, quality matters. Opt for sturdy, durable materials that can support the weight of your blockout curtains. Heavy-duty metal rods and brackets are often a good choice, as they offer the necessary strength and longevity. Make sure the rod you choose is extendable, so it can easily fit your window width and provide the proper support.
In addition to the basics, having a pencil for marking where your brackets will go is essential. Clear, precise markings make it easier to ensure your brackets are level and evenly spaced. A good step ladder is also helpful, especially if you’re installing curtains in a room with high ceilings or large windows.
Before you start, gather all the materials in one place. This preparation will save you time and make the installation process smoother. Also, consider having a drop cloth or an old sheet to protect your floors from dust and debris that may fall while drilling.
Finally, it’s beneficial to read through the installation instructions that come with your curtains and hardware. These often include specific recommendations and steps that are unique to the product you’ve purchased. Familiarizing yourself with these instructions ahead of time can help prevent mistakes and ensure a more straightforward installation process.
By gathering all the necessary tools and materials beforehand, you’ll be well-prepared to install your blockout curtains efficiently and effectively.
Installation Process Made Simple
Getting your blockout curtains installed is a straightforward task that doesn't require professional assistance. Begin by gathering all your tools and materials, including a measuring tape, level, drill, screws, screwdriver, and any necessary wall anchors. Have your curtain rod and brackets ready, along with your new blockout curtains.
Start by marking the placement of your brackets on the wall. Use a pencil to make small marks where you plan to attach the brackets. Measure the distance from the top of the window frame to ensure both sides are even. Use a level to make sure your marks are perfectly horizontal. This step is crucial for keeping your curtains straight and ensuring they function properly.
Next, drill pilot holes where you marked the bracket placements. Pilot holes make it easier to insert screws and help prevent the wall from cracking. If you're drilling into drywall without a stud, insert wall anchors into the holes to provide extra support. Wall anchors are essential for holding the weight of blockout curtains, especially if the fabric is heavy.
Once the pilot holes and anchors are in place, position your brackets over the holes and screw them into the wall. Ensure the brackets are secure and level before proceeding. It's helpful to have a second person assist you in holding the brackets while you screw them in, but this can also be managed solo with a bit of patience.
With the brackets securely attached, it's time to hang the curtain rod. Most rods are adjustable, so extend it to fit your window width. Slide the curtain rod through the loops or grommets in your curtains, depending on the type of header you chose. If your curtains have a rod pocket or pinch pleat, make sure to arrange them evenly on the rod to avoid any bunching.
Lift the rod and curtains together and place the rod onto the brackets. Double-check that the rod is securely seated in the brackets and that the curtains hang evenly. Make any necessary adjustments to ensure a smooth, symmetrical appearance. This step might require a bit of tweaking, but it's essential for achieving that polished look.
Once the rod and curtains are in place, give them a test run by opening and closing them several times. This helps ensure everything is functioning correctly and that the brackets are holding up well. If you notice any issues, such as uneven hanging or difficulty sliding the curtains, make adjustments as needed. Sometimes a minor tweak in the bracket positioning can make a significant difference.
Now that your curtains are installed, take a step back and admire your work. You’ve not only added a stylish element to your room but also improved its functionality by controlling light and enhancing insulation. If you encounter any minor issues during installation, refer to the instructions that came with your hardware or curtains. Manufacturers often provide specific tips and troubleshooting advice that can be very helpful.
Remember, the key to a successful installation is taking your time and ensuring each step is completed accurately. With your blockout curtains now in place, you can enjoy a darker, more comfortable room that better suits your needs.
Maintenance Tips for Long-lasting Curtains
Regular maintenance ensures your blockout curtains remain in top condition for years to come. Start by dusting them weekly. Use a vacuum cleaner with a soft brush attachment to remove dust and debris without damaging the fabric. This simple step prevents dust buildup and keeps your curtains looking fresh.
For a deeper clean, always refer to the manufacturer’s care instructions. Some blockout curtains can be machine washed, while others require dry cleaning. If your curtains are machine washable, use a gentle cycle with cold water and a mild detergent. Avoid using bleach or harsh chemicals, as they can damage the fabric and affect the blockout lining.
If your curtains require dry cleaning, choose a reputable cleaner who is experienced with blockout fabrics. Improper cleaning methods can compromise the light-blocking properties and reduce the lifespan of your curtains. Always check the care label before attempting any cleaning method.
To keep your curtains looking crisp and wrinkle-free, consider steaming them occasionally. A handheld garment steamer can effectively remove wrinkles without the risk of burning or damaging the fabric, unlike an iron. Hold the steamer a few inches away from the fabric and move it slowly across the surface for the best results.
During the winter months, keeping your blockout curtains closed can help improve your home’s energy efficiency. These curtains provide an additional layer of insulation, reducing heat loss by up to 10% through their insulating properties. This simple action can contribute to maintaining a comfortable indoor temperature and potentially lower your heating bills.
Inspect your curtains periodically for any signs of wear and tear. Check the hems, seams, and grommets for loose threads or damage. Addressing minor repairs promptly can prevent further deterioration and extend the life of your curtains. If you notice any small tears or holes, use a fabric repair kit or take the curtains to a professional for mending.
Another important aspect of curtain maintenance is caring for the curtain rod and brackets. Dust these components regularly and check them for any signs of wear or damage. Tighten any loose screws to ensure the brackets remain securely attached to the wall. This step helps maintain the proper function and appearance of your curtains.
If you live in an area with high humidity, consider using a dehumidifier in the room where your blockout curtains are installed. Excess moisture can lead to mold and mildew growth on the fabric. Keeping the humidity levels in check helps protect your curtains and maintain a healthy indoor environment.
To avoid fading, keep your curtains out of direct sunlight when they’re not in use. Prolonged exposure to sunlight can cause the fabric to fade and deteriorate over time. Consider using sheer curtains or blinds in conjunction with your blockout curtains to filter the sunlight and protect the fabric.
When moving or redecorating, handle your blockout curtains with care. Avoid dragging them on the floor or exposing them to sharp objects that could cause damage. Store them in a cool, dry place if you need to remove them temporarily. Use a protective cover or bag to shield them from dust and pests.
By following these maintenance tips, you can ensure your blockout curtains remain a stylish and functional part of your home for many years. Regular cleaning, proper care, and timely repairs will help preserve their appearance and performance, making them a valuable investment in your home’s comfort and décor.
Conclusion and Final Thoughts
Taking on a DIY blockout curtain project allows you to achieve a customized look tailored specifically to your home. By ordering made-to-measure curtains online, you have control over every detail, from the fabric choice to the dimensions, ensuring that the final product perfectly suits your space. This not only enhances the visual appeal of your rooms but also boosts their functionality.
One of the standout advantages of DIY blockout curtains is the ability to significantly improve your home's energy efficiency. These curtains act as an extra barrier against heat loss during winter and heat gain during summer, helping to maintain a stable indoor temperature. This can lead to noticeable savings on your energy bills over time.
Moreover, blockout curtains are incredibly effective at providing privacy and darkening rooms, which is essential for creating a restful environment. Whether it’s for a bedroom, home theater, or nursery, these curtains ensure that you can control the amount of light entering the room, thus improving comfort and sleep quality.
Opting for a DIY approach also brings a sense of accomplishment. Successfully installing your own blockout curtains not only boosts your confidence in handling home improvement tasks but also gives you a deeper appreciation for the finished product. You get to see firsthand how your efforts contribute to making your home a more comfortable and aesthetically pleasing place.
Cost savings are another compelling reason to go the DIY route. By measuring, ordering, and installing the curtains yourself, you can allocate your budget more efficiently. The money saved on professional services can be redirected toward higher-quality materials or other home improvements. This way, you get more value for your investment while still achieving a professional-looking result.
Taking the time to measure accurately and follow the installation guidelines ensures that your blockout curtains will function as intended. The process, while straightforward, requires attention to detail and a bit of patience. The effort is well worth it, as you'll end up with custom curtains that not only look great but also perform exceptionally well.
Regular maintenance will keep your blockout curtains in top condition for years. Simple tasks like dusting and occasional deep cleaning, as per the manufacturer's care instructions, will help preserve their appearance and functionality. Proper care ensures that your investment continues to provide benefits long after the initial installation.
In summary, DIY blockout curtains are a versatile and valuable addition to any home. They offer practical benefits such as improved energy efficiency and enhanced privacy while also allowing for personal customization. By taking on this project yourself, you gain not only financial savings but also the satisfaction of a job well done. With a little effort and attention to detail, you can transform your living space, making it more comfortable, stylish, and tailored to your needs. So why not take the opportunity to enhance your home with DIY blockout curtains? The results will undoubtedly be rewarding.