DIY Blinds: Your Guide to Perfectly Fitting Window Treatments
DIY Blinds: Your Guide to Perfectly Fitting Window Treatments
Introduction to DIY Blinds
Installing your own blinds can be a game-changer for any room, adding a touch of style and improving functionality. DIY blinds offer the flexibility to choose the exact look and feel you want while ensuring they fit your windows perfectly. Not only is this a cost-effective solution, but it also gives you the satisfaction of completing a home improvement project yourself.
One of the major benefits of DIY blinds is the ability to tailor them to your specific needs. Whether you're looking for something that provides complete blackout for a good night's sleep or a light-filtering option for your living room, the choice is entirely yours. Additionally, custom-fit blinds enhance your home's appearance by providing a polished and cohesive look that off-the-shelf solutions often can't match.
DIY blinds might seem daunting at first, but with the right guidance, the process is quite manageable. The key to success lies in careful preparation and precise measurement. Knowing how to properly measure your windows ensures that the blinds will fit perfectly, avoiding the common pitfalls of gaps or misalignment.
When you take on this project, you’ll also need a few essential tools and materials. Having everything on hand before you start will make the installation process go smoothly. Besides, it's always a good idea to familiarize yourself with the types of blinds available, such as roller, Roman, or Venetian, so you can make an informed decision based on your preferences and the specific requirements of each room.
An important step in the process is choosing the right materials for your blinds. This decision will largely depend on the room's purpose and the amount of light control you need. For instance, blackout materials are perfect for bedrooms, while light-filtering fabrics are great for common areas where you still want some natural light.
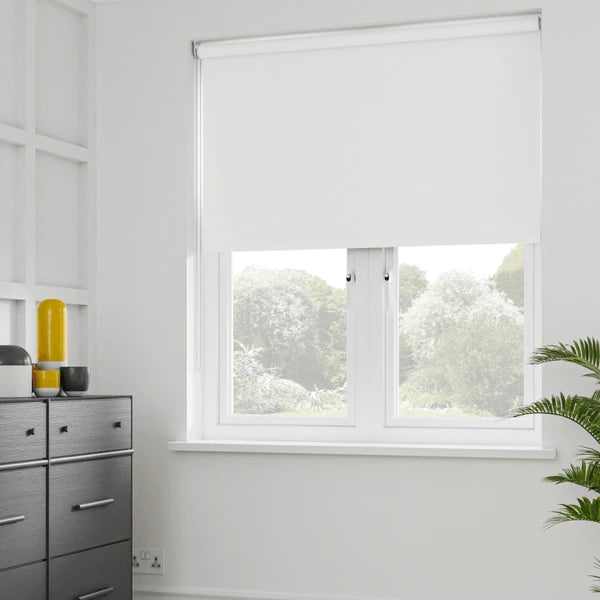
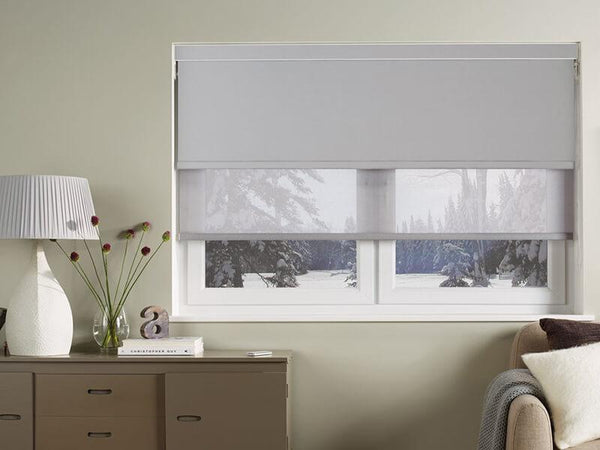
Another crucial aspect to consider is the mounting style. You can choose between inside mount and outside mount blinds. Inside mount blinds are installed within the window frame, offering a clean and streamlined look. On the other hand, outside mount blinds are installed outside the window frame, providing better coverage for light and privacy.
The actual installation process involves securing brackets and fitting the blinds, which is straightforward with the right instructions. However, it's always good to be prepared for minor adjustments and troubleshooting to ensure everything fits and functions as expected. This hands-on experience not only saves money but also enhances your DIY skills.
Taking care of your newly installed blinds is equally important to maintain their appearance and functionality. Regular cleaning and proper maintenance will keep them looking new and ensure they operate smoothly for years to come.
Embarking on a DIY blinds project can be both enjoyable and rewarding. With the right approach and attention to detail, you can transform any window into a stylish and functional focal point in your home.


Tools and Supplies Needed
Before diving into your DIY blinds project, it's crucial to gather the right tools and supplies. Having the appropriate tools will make the process smoother and help ensure that your blinds are installed correctly.
You'll need a steel tape measure to get accurate window dimensions. A pencil will come in handy for marking measurements and bracket placement. A level is essential to ensure your blinds are mounted straight, which is key for both aesthetics and functionality. A drill with bits is required for making holes to secure the brackets, and a screwdriver is necessary for attaching the blinds to the brackets.
Depending on the type of blinds you're installing, you might also need additional items like wall anchors, which provide extra support when you're attaching brackets to drywall or plaster. Brackets are usually included with your blinds, but it's a good idea to double-check that you have the correct type and number needed for your specific installation.
When it comes to choosing materials, it's important to consider the function of the room. Light-filtering fabrics work well in living areas where you want to maintain some natural light while reducing glare and UV exposure. For bedrooms or media rooms, blackout materials are ideal because they block out nearly all light, creating a dark environment perfect for sleeping or watching movies.
If your blinds come with a cord or chain mechanism, you may need to install a safety device to keep them out of reach of children and pets. These safety devices are often included with the blinds, but if not, they can be purchased separately.
Having a step stool or ladder can be very useful, especially if you're installing blinds on tall windows. It allows you to reach the top of the window frame comfortably and safely. Additionally, keep some cleaning supplies handy to wipe down the window area before installing the blinds. Dust and debris can interfere with the adhesive on some brackets or make it difficult to secure screws properly.
You'll also need some basic safety gear. Wearing safety glasses will protect your eyes when you're drilling holes, and gloves can provide a better grip on tools while protecting your hands from potential scrapes and blisters.
Lastly, it’s a good idea to have the manufacturer's instructions for your specific blinds on hand. Each type and brand can have unique installation steps, and following these guidelines will help ensure a successful setup.
Measuring Your Windows
Accurate window measurements are essential for custom blinds. For an inside mount, begin by measuring the width of the window in three places: the top, middle, and bottom. Record the narrowest width to ensure a snug fit. Then, measure the height in three locations: the left, center, and right sides of the window. Use the longest height measurement for accurate fitting.
When measuring for outside mount blinds, add extra width to your window dimensions to cover the trim and ensure complete light blockage. Measure the width from the outer edge of the trim on one side to the outer edge on the other side. For height, measure from the desired top of the blinds to the bottom edge you want them to reach.
Remember to use a steel tape measure for precision, as cloth or plastic tape measures can stretch and give inaccurate results. Make sure to write down all measurements clearly and double-check them to avoid mistakes when placing your order. If your windows are not perfectly square, inside mount blinds will still work, but outside mount blinds may be a better option to cover any irregularities.
Ordering Your Custom Blinds
Once you have your measurements, the next step is choosing the style and material that will best suit each room. Begin by considering the room’s decor and the level of light control you desire. For example, blackout blinds are ideal for bedrooms, while light-filtering options work well in living areas.
When you're ready to order, provide the manufacturer with your exact measurements. Make sure to specify whether the blinds are for an inside or outside mount, as this will affect how they are made. Double-check all your measurements and entries to ensure accuracy and avoid any mistakes.
Most manufacturers offer a range of customization options, including different colors, patterns, and materials. Take your time to browse through these options and select those that best complement your home’s interior design. You might also consider additional features like motorization for ease of use, especially in hard-to-reach windows.
Once you’ve made your selections, follow the ordering process outlined by the manufacturer. This typically involves filling out an online form or speaking with a customer service representative. Be prepared to answer questions about your measurements and mounting preferences to ensure your blinds are made to your specifications.
Some manufacturers also provide samples of materials and colors. If you’re unsure about your choices, ordering samples can help you make a more informed decision. Samples allow you to see and feel the materials, ensuring they match your expectations and complement your room’s decor.
Pay attention to the estimated delivery times provided by the manufacturer. Custom blinds often take longer to produce and ship than off-the-shelf options. Plan accordingly, especially if you’re working on a tight timeline or coordinating with other home improvement projects.
Finally, review the manufacturer’s return and warranty policies. Understanding these terms can provide peace of mind in case there are any issues with your order. Most reputable manufacturers offer warranties on their products, ensuring you receive a high-quality, long-lasting product.
By carefully selecting the style, material, and customization options, and double-checking all your measurements, you can ensure that your custom blinds will meet your needs and enhance your home's interior.
Installation Process
Begin by clearing the area around your window to create ample working space. Make sure you have all the necessary tools and materials within reach. Refer to the manufacturer's instructions that came with your blinds, as these will offer specific guidance tailored to your product.
For inside mount blinds, start by marking the bracket locations inside the window frame. Use a pencil to mark where the screws will go. It’s crucial to ensure that the brackets are level, so use a level to verify their alignment before drilling any holes. Once you're confident that the marks are level and correctly placed, proceed to drill pilot holes for the screws. This step will make it easier to secure the brackets without splitting the wood.
Next, attach the brackets to the window frame using the screws provided. If you're attaching brackets to drywall or plaster, you might need wall anchors for added stability. Tighten the screws firmly, but avoid over-tightening, which can strip the screws or damage the window frame.
Once the brackets are securely in place, it's time to mount the blinds. Depending on the type of blinds you're installing, this might involve snapping the headrail into the brackets or sliding it into place. Make sure the blinds are secure and operate smoothly by testing them several times. If you encounter resistance or difficulty, double-check the alignment and ensure that no parts are obstructing the mechanism.
For outside mount blinds, start by measuring and marking where the brackets will be placed above or on the window frame. Use a level to make sure these marks are perfectly horizontal. This step is crucial to ensure the blinds hang straight. Drill pilot holes at the marked locations, then secure the brackets using screws. Like with inside mount blinds, you may need wall anchors if attaching the brackets to drywall or plaster.
Attach the headrail of the blinds to the brackets, ensuring it is securely in place. Test the operation of the blinds to make sure they move up and down smoothly. If they are difficult to operate, check that the brackets are level and that there are no obstructions.
Once the blinds are installed, take a moment to adjust the tension or alignment if necessary. Some blinds come with a tension adjustment feature, which allows you to modify how easily they raise or lower. Consult your manufacturer's instructions for specific guidance on making these adjustments.
If your blinds come with a cord or chain mechanism, it’s essential to install the safety device that keeps these components out of reach of children and pets. Follow the manufacturer's instructions to secure the safety device to the wall or window frame.
Lastly, take a step back and ensure the blinds look and function as expected. This is the time to make any final adjustments to ensure a perfect fit. If the blinds appear uneven, you may need to adjust the brackets or the headrail. If the blinds are not operating smoothly, double-check for any obstructions or misaligned parts.
By following these steps and referring to the specific instructions provided by your manufacturer, you can achieve a professional-looking installation and enjoy the benefits of your new custom blinds.
Troubleshooting and Adjustments
During the installation process, you might encounter some common issues that require minor adjustments. Here are some tips to address them effectively:
Blinds Too Tight or Too Loose: If the blinds feel too tight or too loose when operated, check the tension adjustment. Many blinds have a mechanism to modify the tension for a smoother operation. Refer to your manufacturer's instructions for the exact method to adjust the tension settings.
Uneven Blinds: If your blinds appear uneven or one side hangs lower than the other, you may need to re-check the bracket alignment. Ensure that both brackets are level and at the same height. Adjust the brackets if necessary and verify the alignment using a level.
Misaligned Blinds: If the blinds do not align properly when closed, it may be due to misaligned brackets. Loosen the screws on the brackets slightly and adjust their position until the blinds are correctly aligned. Tighten the screws once the alignment is satisfactory.
Blinds Not Lowering or Raising Properly: If the blinds are difficult to lower or raise, ensure that the headrail is securely fastened in the brackets. Sometimes, the blinds might not be fully engaged in the mounting brackets, leading to operational issues. Double-check the headrail placement and make sure it clicks or slides into place as per the instructions.
Brackets Not Secured: If the brackets feel loose or unstable, make sure the screws are tightened properly. If you mounted the brackets on drywall or plaster, ensure that wall anchors were used for added stability. Loose brackets can lead to operational issues and affect the overall appearance of the blinds.
Blinds Stuck or Jamming: If your blinds get stuck or jam when operated, inspect for any obstructions within the mechanism or around the headrail. Dust, debris, or even minor misalignments can cause jamming. Clean the area and ensure that all parts are free from obstructions.
Cord or Chain Issues: For blinds with cord or chain mechanisms, ensure that they are not tangled or twisted. A tangled cord or chain can impede the operation of the blinds. Straighten out any twists and ensure that the safety device is properly installed to keep the cord or chain out of reach of children and pets.
Headrail Not Level: If the headrail appears tilted or not level, double-check the placement of the brackets. They should be installed at the same height and level. If the brackets are level but the headrail still appears tilted, the issue might be with the headrail itself. Inspect the headrail for any bends or defects and contact the manufacturer if necessary.
Brackets Interfering with Blind Operation: In some cases, the brackets themselves might interfere with the operation of the blinds. Make sure the brackets are installed as per the manufacturer’s guidelines and that they do not obstruct any moving parts of the blinds.
Light Gaps on Inside Mount Blinds: If you notice light gaps on the sides of your inside mount blinds, it could be due to incorrect measurements or installation. While some minor gaps are normal, excessive gaps might require adjusting the brackets or re-evaluating the measurements. Consider using side channels or light-blocking strips to minimize light gaps.
By addressing these common issues and making the necessary adjustments, you can ensure that your blinds are installed correctly and function smoothly. Following the manufacturer’s instructions and using the right tools will also contribute to a successful DIY blinds installation.
Caring for Your New Blinds
Proper maintenance is crucial to ensure that your blinds continue to function well and look their best. Regular dusting with a soft cloth or a vacuum cleaner equipped with a brush attachment is a simple way to keep them clean. For blinds in high-traffic areas or rooms with more dust, consider dusting them weekly to prevent buildup.
For a more thorough cleaning, a mild detergent mixed with water can be effective. Use a soft sponge or cloth to gently wipe down the slats or fabric, avoiding excessive moisture that could damage the material. Always test the cleaning solution on a small, inconspicuous area first to make sure it doesn't cause any discoloration or damage.
Wooden blinds require special care to maintain their finish. Avoid using water or any harsh chemicals on wood. Instead, use a furniture polish or wood cleaner specifically designed for such materials. Lightly spray the cleaner onto a cloth and wipe the slats, ensuring that they are completely dry afterward to prevent warping or discoloration.
For fabric blinds, spot cleaning is often the best method. Blot any stains with a cloth dampened with a mild soap and water solution. Be sure to blot rather than rub, as rubbing can push the stain further into the fabric or cause it to spread. If the fabric is detachable, you might be able to machine wash it, but always check the manufacturer's care instructions first.
Vertical blinds also need regular attention. Dusting each slat individually can be time-consuming but is effective in maintaining their appearance. For deeper cleaning, you can remove the slats and lay them flat to wipe down with a mild detergent solution. Make sure they are thoroughly dry before re-hanging to prevent mold or mildew.
Blinds with metal components, such as aluminum or steel, can be cleaned with a non-abrasive cleaner to avoid scratching the surface. These materials are generally more durable and resistant to stains, but they can still benefit from regular dusting and occasional wiping with a damp cloth.
Maintaining the mechanisms and cords is equally important. Check the cords and pulleys regularly for signs of wear and tear. If you notice any fraying or damage, replace them promptly to ensure the blinds continue to operate smoothly. Lubricate the moving parts with a silicone-based spray if you find them sticking or difficult to operate.
If you have motorized blinds, keep the battery or power source in good condition. Recharge or replace batteries as needed and keep the remote control or wall switch clean and free from dust.
Environmental factors can also impact the longevity of your blinds. In areas with high humidity, such as bathrooms or kitchens, consider using materials that are resistant to moisture, like PVC or aluminum. For blinds in direct sunlight, UV-resistant materials can help prevent fading and deterioration.
By integrating these cleaning and maintenance tips into your routine, you'll not only keep your blinds looking great but also ensure they continue to operate efficiently. Regular care can significantly extend the lifespan of your blinds, making your DIY investment worthwhile.